Client Design and Implementation
Table of Contents
In this part, we explain the client design and implementation.
TODO: Explain about the base design of the interface.
1. Languages and Libraries Used
We decide to use the following languages and libraries for implementing the client interface according to the Web technology development.
1.1. CoffeeScript
We're using Javascript for the Front-End animations and UI responses, but it has some trinckets when it is needed to represent a UML Booch:2005:UML design because:
- Javascript is a prototiped object oriented language, so we have to simmulate the class instantiation process.
- The reserved word
classis in the ECMASCRIPT 2015 standard but still not supported for all the new Web Browser at the current date (2016). - Javascript need to resolve some problems that need some works like variable scoping, prototype chain, etc.
CoffeScript is a language that compiles into Javascript, it more simple to learn and support scoping and classes. Documentation and installation instructions are available at http://coffeescript.org/.
1.2. JointJs
Joint is a Javascript library for easily create diagrams. It is based on Backbone library and follows its Model-View arquitecture, the Model represents the diagrams elements and its views are handled internally by the Graph instance.
We consider this library for the following reasons:
- Reducing de amount of code for creating the UI.
- Focus mostly on the model that represents the user's diagrams elements and solely for the actions responses on the view.
- Give support for the future development on a new graphical languages creating a new Joint plugin.
- Easy processing of the user's current diagram into a JSON format for sending to the server and translating into OWL/OWLlink.
Joint documentation and installation instructions are in https://www.jointjs.com/. It is distributed under de Mozilla Public License (MPL) version 2.0.
1.2.1. Programming with Joint
Joint provides two objects prototypes:
- A
Graphwill provide a way to collect all the diagramas elements from the Joint model. - A
Paperinstance represents the place where the models on the Graph will be drawed. The view part associated to a Graph model.
First, you have to create an HTML5 document with a <div> and associate it to the Paper instance on Javascript. The explanation that follows will show the basic code for working with the library.
The HTML5 document. Only the "body" part is showed here:
<div id="myJoint"></div>
First we associate the UML plugin package to the uml variable. Then, we create the Paper and Graph instance.
var uml = joint.shapes.uml;

var graph = new joint.dia.Graph
var paper = new joint.dia.Paper({
    el: $('#paper'),
    width: 600,
    height: 400,
    gridSize: 10,
    model: graph
})
We assign the CSS class we're going to use for our class diagram.
var mycss = {
    '.uml-class-name-rect' : {
    fill: "#fff"},
    '.uml-class-attrs-rect' : {
    fill: "#fff"},
    '.uml-class-methods-rect' : {
    fill: "#fff"}};
This code create the UML class element assigning its name, CSS, position and size. Finally, the last line will add the recenty created element to the Graph instance.
var myclass = new uml.Class({
    position: {x: 10, y: 10},
    size: {width: 220, height: 100},
    name: 'My UML Class',
    attrs: mycss});

graph.addCells([myclass]);
Secondly, for creating a UML Class we should import the plugin, optionally use an alias for it and then instantiate the joint.shapes.uml.Class class to create a class diagram element with the apropiate parameters:
- Size of the element (widht and height).
- Position of the element on the Paper.
- Name of the element.
- Attributes and methods as a list of strings.
- The CSS to use to change the draw appearance (colors, lines, background, fonts, etc.).
Finally, the Graph instance must be instructed to use this class adding it to its collections using the addCells() function.
The previous explanation shows the fragments of code needed for implementing these steps. At section Our Model we'll describe our model which it creates a common representation for UML, ERD or any diagram added as plugins helping the developer on the creation of the Joint object needed for drawing on the Paper instance.
The HTML5 document. Only the "body" part is showed here:
<div id="myJoint"></div>
The Javascript code for creating the Paper and Graph instance:
var graph = new joint.dia.Graph
var paper = new joint.dia.Paper({
    el: $('#paper'),
    width: 600,
    height: 400,
    gridSize: 10,
    model: graph
})
1.3. JQuery y JQueryMobile
TODO: Explain what JQuery and JQueryMobile are, its usage is beyond this document.
1.4. Bootstrap
In the latest version, Bootstrap 4 is introduced instead of JQueryMobile. It can be downloaded from the URL http://getbootstrap.com.
This library is used most common Web pages and has more efficiency in response time.
1.5. Backbone
TODO: Add Backbone website at the bibliography. TODO: Explain what Backbone is and see if the usage fits this document purpose.
2. Our Model
In the file mymodel.js will find our model, it represents all our diagrams elements we'll give support from the basis and it will be used for creating the JSON file that represents our diagram and that can be translated to OWL.
The JSON string can be generated directly applying the Javascript toSource() (see the function documentation at MDN) function to the object we want to represent. However, using this method will add objects functions and attributes to the JSON representation that the server won't need and make the debugging difficult. In order to solve this issue, we create a function called to_json() in each primitive class that return a JSON object that can be transformed into a string for sending to the server.
A MyModel class will define the common behaviour and information all our diagram elements wil have, initially we want a name as mandatory for all elements, even links. Then, we created a Class subclass that represents the UML Class primitive and it can have attributes and methods lists.
All of our models instances have a relation and can create its propper Joint object so it can update its view with the correct information our model have.
3. Using the Abstract Factory Pattern for Reusing Code
We contemplate the possibilities for giving support not only for the UML graphical language, also for ERD and, in the near future, OMR. Creating and editin diagrams elements has some differences that has to be taken in mind while programming the Front-End and while translating it to Description Logic and OWL/OWLlink.
We decided to use an Abstract Factory pattern mixed with an Observer for resolving this conflict. The figure fig:abstract_factory_observer show the design of our model.
j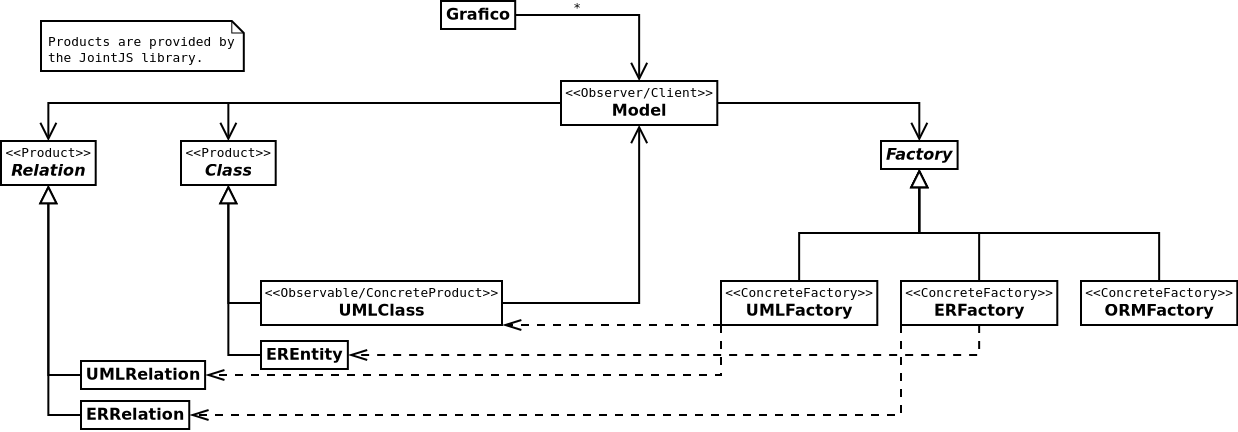
4. GUI classes
The interface supports widgets and diagram objects for different languages. This are accessible throug the gui package. The following design is intended to provide simple access from different part of the software while providing an organized development environment.
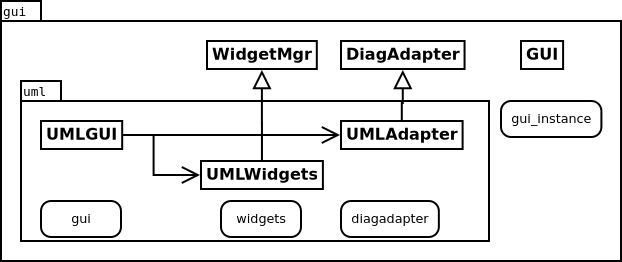
Figure 1: The packages gui and gui.uml, their classes an objects.
The GUI class handles differents GUIIMPL instances. Each GUIIMPL are a representation of the language interface, its events, widgets and diagram. The WidgetMgr subclasses manages all the widgets needed. DiagAdapter provides a bridge between interface and the model diagram object, useful when showing the diagram response in the UI while doing a modification to the MyModel subclass object.
Some widgets are common to all languages. For supporting them, the design includes a WidgetMgr associated with the GUI class.
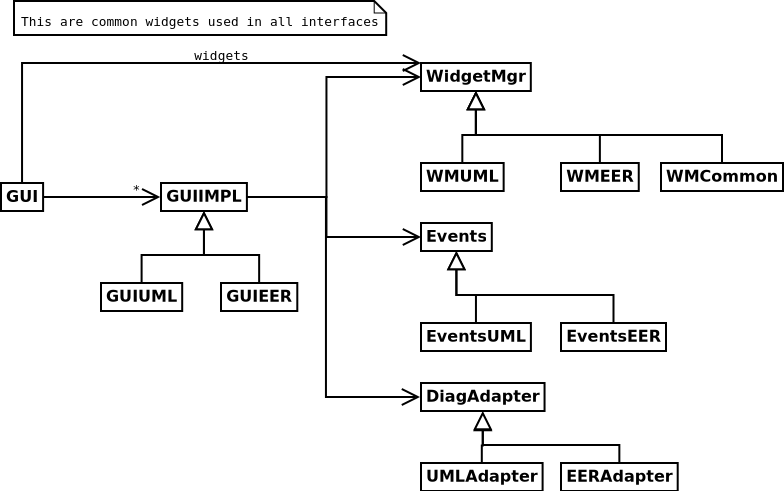
Figure 2: Classes for the GUI package and their relationships.
5. Widgets in crowd Client
A widget is created adding and modifying the following files:
- Add a widget Backbone.View subclass.
- Add a widget HTML or PHP template.
- Modify the
WidgetMgrsubclass (for UML isUMLWidgets) for creating an instance of the widget class. - Add a template in
all_templates.php. - Add a
divas a placeholder inplaceholders.php.
The compiler script will merge all CoffeeScript views founded in coffee/views directory automatically.
For example, supose we want to create a modal dialog, common to UML, EER and ORM interfaces, called "Warning". We need to create a CoffeeScript file that will render and accepts events and a template PHP file which represent the HTML visual part.
The CoffeeScript file will be stored in /coffee/views/common/warning_widget.coffee.
exports = exports ? this
exports.views = exports.views ? {}
exports.views.common = exports.views.common ? this


WarningWidget = Backbone.View.extend
    initialize: () ->
        this.render()

    render: () ->
        template = _.template $("#template_warning").html()
        this.$el.html template({})

    events:
        "click button#done_button" : "hide"

    hide: () ->
        this.$el.modal 'hide'

    show: () ->
        this.$el.modal 'show'


exports.views.common.WarningWidget = WarningWidget
The PHP file, is stored in the same folder and must be called accordingly (i.e. /coffee/views/warning.php).
<div class="modal fade" id="warning_widget" tabindex="-1" role="dialog"
aria-labelledby="warning_widget" aria-hidden="true">
<div class="modal-dialog" role="document">
<div class="modal-content">
<div class="modal-header alert alert-warning">
<h1 class="modal-title"> Warning: </h1>
<button type="button" class="close" data-dismiss="modal"
aria-label="close">
<span aria-hidden="true">×</span>
</button>
</div>
<div class="modal-body">
<dl>
<dt>Status:</dt><dd>
<div id="errorstatus_text"></div>
</dd>
<dt>Server Answer:</dt><dd>
<pre>
<div id="errormsg_text"></div>
</pre>
</dd>
</dl>
</div>
<div class="modal-footer">
<button type="button" class="btn btn-primary" data-dismiss="modal">
Hide
</button>
</div>
</div>
</div>
</div>
The client needs to load the widget in its Javascript code. For that purpose, we
create an instance of the view in the constructor of CommonWidgets.
class CommonWidgets extends gui.WidgetMgr
    constructor: () ->
        super()
        # ...
        @warningwidget = new views.common.WarningWidget
            el: $("#warning_placeholder")
The following code adds the template, it should be inserted in the
all_templates.php:
insert_template("warning", "common");
This function searchs for the warning.php file inside the
/coffee/views/common.
Finally, we add the placeholder in the placeholders.php file:
<div id="warning_placeholder"></div>
6. Testing with QUnitJS
TODO: Add QUnitJS website at the bibliography. TODO: Explain how testings has to be create.
The development of WICOM is separated on some stages and modules. Implementing each module and testing it "by hand" can work for the first time, but when implementing the second stage or adding a new feature we may break the code we have created before.
For detecting this, we create some black-box unit tests while writing the code. The idea is this: we wrote the expected value that each important function or feature should answer when executed with a predefined parameter.
QUnit help us on writing the comparation between the results and the function calling, and also it execute each test automatically and show us the results in a propper format for easy detect the problems. It only works for Javascript (or compiled CoffeScript) code, in the following section we'll explain the unit testing for PHP.
6.1. Writing QUnitJS testings
TODO: Write the template here!!!
For different constructors, like different JSON objects, and trying to assert using equal will lead to a fail testing always, instead we use propEqual as the example on figure for checking each property values instead the object itself. 1
This problem may arise when trying to create a testing unit for a function that returns a JSON object and we write the expected value using a literal object.
TODO: Insert QUnitJS example here.
7. References
Footnotes:
See https://api.qunitjs.com/propEqual/ for more information about propEqual function.